
Have you ever returned to a Flutter app after a phone call, app switch, or even a system kill—only to find everything reset? Frustrating, right? Modern users expect apps to seamlessly pick up exactly where they left off, no matter what interruptions occur. This is where Flutter State Restoration comes into play.
In this blog, “Flutter State Restoration Explained: Keep Your App Alive Seamlessly,” we’ll break down what state restoration really means, why it matters for real-world apps, and how Flutter makes it possible to preserve UI state across app terminations and lifecycle changes. Whether you’re building a simple form or a complex multi-screen experience, mastering state restoration will help you deliver a smoother, more professional user experience.
What is Flutter State Restoration?
Flutter State Restoration is a built-in mechanism that allows an app to automatically save and restore its UI state when it is killed and later recreated by the operating system due to events like app switching, low memory, or system interruptions. It ensures that users can return to the exact screen, scroll position, form input, or selected UI state they were on before the app was closed, providing a seamless user experience. Unlike regular state management, which handles in-memory app behavior, state restoration persistently stores UI state using Flutter’s restoration framework so that it can survive full app restarts, making apps more reliable and user-friendly.
Implementation
Flutter app root widgets such as MaterialApp, CupertinoApp, and WidgetsApp already include a RootRestorationScope by default, so we don’t need to create one manually. All we need to do is assign a restorationScopeId, which will be used by the internal root restoration scope. It’s important to note that if this ID is not provided, state restoration remains disabled, so this step should not be overlooked. One major benefit of setting a restoration scope ID is that it also allows the Navigator created by WidgetsApp to restore its state, including the full navigation route history.
To understand how state restoration works in practice, let’s take the example of preserving the selected index of a BottomNavigationBar. To achieve this, we need to provide a restorationScopeId to MaterialApp (or CupertinoApp/WidgetsApp), mix RestorationMixin into the state class of our home page and implement its required methods, define restorable properties instead of using regular Dart variables, and register those properties for restoration. Once these steps are completed, Flutter automatically handles saving and restoring the state for us.
Let us understand through a code example:
import 'package:flutter/material.dart';

void main() => runApp(MyApp());

class MyApp extends StatelessWidget {
  @override
  Widget build(BuildContext context) {
    return MaterialApp(
      // Give your RootRestorationScope an id, defaults to null.
      restorationScopeId: 'root',
      home: HomePage(),
    );
  }
}

class HomePage extends StatefulWidget {
  @override
  _HomePageState createState() => _HomePageState();
}

// Our state should be mixed-in with RestorationMixin
class _HomePageState extends State<HomePage> with RestorationMixin {

  // For each state, we need to use a restorable property
  final RestorableInt _index = RestorableInt(0);

  @override
  Widget build(BuildContext context) {
    return Scaffold(
      body: Center(child: Text('Index is ${_index.value}')),
      bottomNavigationBar: BottomNavigationBar(
        currentIndex: _index.value,
        onTap: (i) => setState(() => _index.value = i),
        items: <BottomNavigationBarItem>[
          BottomNavigationBarItem(
              icon: Icon(Icons.home),
              label: 'Home'
          ),
          BottomNavigationBarItem(
              icon: Icon(Icons.notifications),
              label: 'Notifications'
          ),
          BottomNavigationBarItem(
              icon: Icon(Icons.settings),
              label: 'Settings'
          ),
        ],
      ),
    );
  }

  @override
  // The restoration bucket id for this page,
  // let's give it the name of our page!
  String get restorationId => 'home_page';

  @override
  void restoreState(RestorationBucket? oldBucket, bool initialRestore) {
    // Register our property to be saved every time it changes,
    // and to be restored every time our app is killed by the OS!
    registerForRestoration(_index, 'nav_bar_index');
  }
}
How to Test?
If you want to test this code (or your code during development), you will need to enable the “Don’t keep activities” options in your device’s Developer Options.
- Open the Developer options settings, and enable the option
Don't keep activities.
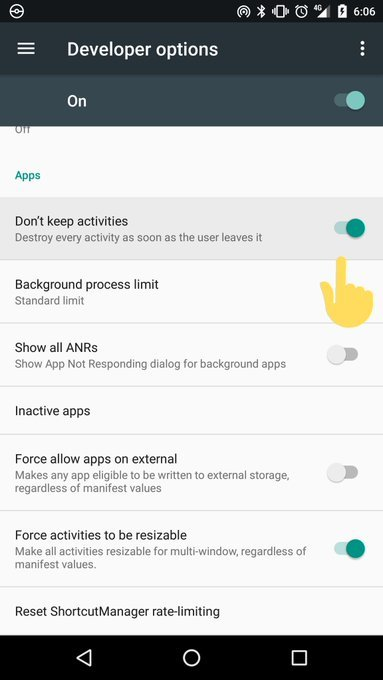
This will simulate the lack of memory and the device will kill all activities as soon as you leave it.
- Run the code above app and tap the
Settingsitem; - Go to the launcher by pressing the device’s home button. Press the overview button and return to the app.
- notice that the
Settingsitem is still selected.

Conclusion
Have you ever returned to a Flutter app after a phone call, app switch, or even a system kill—only to find everything reset? Frustrating, right? Modern users expect apps to seamlessly pick up exactly where they left off, no matter what interruptions occur. This is where Flutter State Restoration comes into play.
In this blog, “Flutter State Restoration Explained: Keep Your App Alive Seamlessly,” we’ll break down what state restoration really means, why it matters for real-world apps, and how Flutter makes it possible to preserve UI state across app terminations and lifecycle changes. Whether you’re building a simple form or a complex multi-screen experience, mastering state restoration will help you deliver a smoother, more professional user experience.